|
05.08.2008
ISA Server 2006 as an L2TP/IPsec VPN server and Mac OS X 10.4.x as L2TP/IPsec VPN clients - Part 3: IKE Authentication with Certificates - The Quick and Dirty Way: Using an OpenSSL CA
- 1. OpenSSL Quick Start Config
- 2. Create the CA: Generate A Self-Signed Certificate
- 3. Create a Certificate for ISA
- 4. Create a Certificate for a Mac VPN Client Called For Example macx
- 5. Create a Certificate for a Mac VPN Client Called For Example macy
- 6. Convert ISA's Certificate to PKCS #12 Format
- 7. Convert macx's Certificate to PKCS #12 Format
- 8. Convert macy's Certificate to PKCS #12 Format
- 9. Convert CA's Certificate from PEM to DER
- 10. Check the Export Folder
- 11. Import on ISA the CA Certificate and ISA's Certificate
- 12. Create a CRL
- 13. Install the CRL on ISA
- 14. Import the Certificate Used for IKE Authentication on the Mac OS X
- 15. Configure the L2TP/IPsec VPN Connection on the Mac OS X
- 16. Revoke a Client's Certificate, Create a New CRL and Import This New CRL on ISA
So, you've tried many combinations in an attempt to configure your Mac OS X L2TP/IPsec VPN clients to use IKE authentication with certificates with your ISA Server 2006, certificates issued for the Mac VPN Clients and ISA by an internal Windows Enterprise CA.
You may have a couple of certificates installed on ISA issued by this CA, so you have troubles identifying which certificate is ISA picking for IKE authentication, if this certificate has the "correct" fields required by the Mac OS X L2TP/IPsec VPN clients' security checks.
Till now this "game" left you fuming.
I've mentioned in the first part of this article about the posibility of using a separate CA to issue certificates just for the Mac OS X L2TP/IPsec VPN clients and ISA, certificates that can be used for IKE authentication.
If you have not gave up, and you are still searching for a solution, one such solution can be to use an OpenSSL CA to issue the needed certificates for IKE authentication.
Your Windows L2TP/IPsec VPN clients will continue to use the same certificates they used before for IKE authentication.
We will use this OpenSSL CA just to issue to ISA a "valid"(from the perspective of the Mac OS X L2TP/IPsec VPN clients) certificate and also to issue certificates for the Mac OS X L2TP/IPsec VPN clients.
I'm using an OpenSSL CA because it can easily issue the "correct" certificate for ISA that will work with Mac OS X L2TP/IPsec VPN clients.
We have seen that it is recommended to have installed on ISA a certificate with no EKU field and with the SAN field containing a DNS Name, a FQDN which the Mac OS X L2TP/IPsec VPN clients will use as their VPN server address.
Since only one certificate will be installed on ISA issued by this CA, you will know for sure what certificate will be used for the IKE authentications between ISA and the Mac OS X L2TP/IPsec VPN clients. No more "games".
I will use a Windows XP SP3 x32 machine on which I will install OpenSSL. Make sure the machine you will use is a "clean" and safe machine. It would not be a good idea to use a machine which was infected with a virus or so.
I've downloaded, copied and installed on my machine the latest OpenSSL version for Windows from here, as writing Win32 OpenSSL v0.9.8h.
1. OpenSSL Quick Start Config
This article is not an OpenSSL CA How To, so I won't enter into many details. There are plenty of articles out there covering this subject. You may like two read these excellent articles:
- http://www.madboa.com/geek/openssl/ OpenSSL Command-Line HOWTO
- http://security.ncsa.uiuc.edu/research/grid-howtos/usefulopenssl.php Useful OpenSSL Commands
I've created a working folder on my C:\ drive. I've call it CA.
You can download this folder from here as a zip archive if you want, so you can start right away issuing certificates.
Within this folder I've added the following files and folders, see Figure1:
- the crl folder, an empty folder which will be used to store the CRLs.
- the export folder, and empty folder which will be used to hold the converted certificates from PEM to PKCS #12 format.
- the keys folder, a folder that will store the private keys that OpenSSL will generate for the CA, ISA and the Macs
- the newcerts folder, a folder that will store the certificates in PEM format that OpenSSL will issue for the CA, ISA and the Macs
- the reqs folder, a folder that will store the CSR for ISA and the Macs
- the index.txt file, an empty text file, the database index file.
- the openssl.cfg file, this is a modified version of the standard OpenSSL config file found in the default installation folder, C:\OpenSSL\bin. I've quickly modified the standard version so that I can create a CA certificate and start signing certificates with this CA's private key. You can further enhance this openssl.cfg to fit your needs.
- the serial.txt file(holding the current serial number), a text file containing 01 and a new line(create an empty text file, enter 01, hit enter and then save the changes).
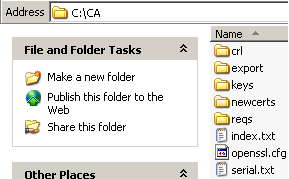
Figure1: CA Folder
For example, using the openssl.cfg file you will issue RSA 2048-bit private keys for your clients, the default hash algorithm for signing the clients' certificates is SHA-1.
The client's certificates will contain the extension basicConstraints = CA:FALSE (thus the users will not be able to create subordinate certificates).
The clients certificates will not have the EKU or the SAN fields. We will make a modification to this openssl.cfg file in order to issue to ISA a certificate with the needed SAN entry.
Some quick modifications you may want to do: change the default values for Country Name, State or Province Name, Locality Name or Organization Name. So you won't be needed to enter every time you create a CSR these values. Right now, the openssl.cfg file included in the zip archive contains my default values, see Figure2.
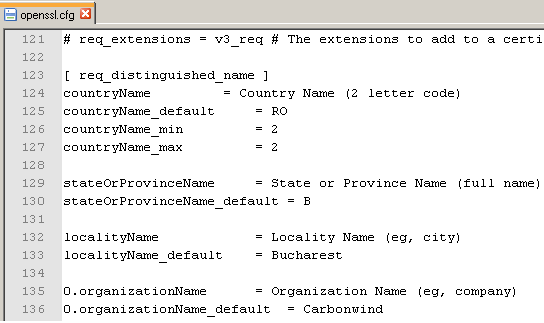
Figure2: openssl.cfg - Modify Some Default Values
2. Create the CA: Generate A Self-Signed Certificate
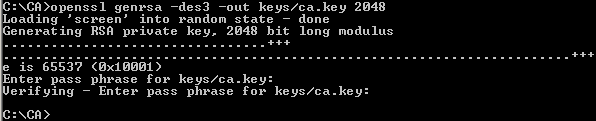
First we will create a 2048-bit RSA private key for our CA, see Figure3. Enter a good password to protect the CA's private key, a security measure(the private key will be encrypted using 3DES). You will need to enter this password each time you want to sign a client's certificate or to sign the CRL.
openssl genrsa -des3 -out keys/ca.key 2048
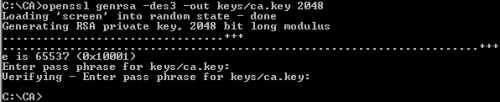
Figure3: Generate The CA Private Key
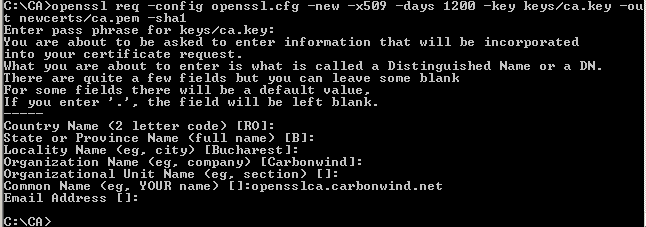
Next we will create the self-signed cerificate of our CA, the root certificate, see Figure4. You will be prompted to enter the password of the CA's private key. Modify as desired the valability period of the CA's certificate. Use a suggestive CN(common name) for your CA.
openssl req -config openssl.cfg -new -x509 -days 1200 -key keys/ca.key -out newcerts/ca.pem -sha1
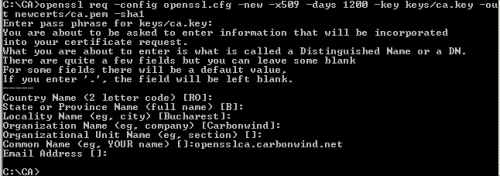
Figure4: Create the Self-Signed CA Certificate
3. Create a Certificate for ISA
I will use a 750 days valability period for ISA's certificate.
Now we need to create the certificate signing request for ISA that we will send to our CA for signing.
The first thing to do, is to edit the openssl.cfg file because we need to to issue a certificate that will contain a SAN entry DNS Name, in my case isa.carbonwind.net. If ISA's certificate does not contain this entry, the Mac VPN client will not accept ISA's certificate. Also the Mac VPN client will us this FQDN as the address of the VPN server, so make sure that this is a name that the Macs can resolve, either using a public DNS server or their local /etc/hosts file.
I've already added the needed line to the openssl.cfg file, you just uncomment it(remove the #) and enter the desired DNS Name, see Figure5.
Then save the changes made.
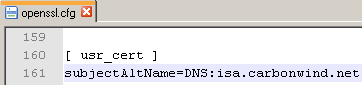
Figure5: Uncommented line: subjectAltName=DNS:isa.carbonwind.net
Next will generate ISA's RSA private key(the default 2048-bit value will be used) and the CSR, see Figure6. Enter a good password to protect the private key(3DES will be used to encrypt the private key). I've used the CN (common name) isa.carbonwind.net, the same FQDN entered in the SAN field.
Because I've configured some default values in the openssl.cfg, I do not need to manually enter every time I issue a certificate, the country code, locality name, state name...
openssl req -config openssl.cfg -days 750 -new -keyout keys/isa.key -out reqs/isa.csr

Figure6: Create ISA's CSR
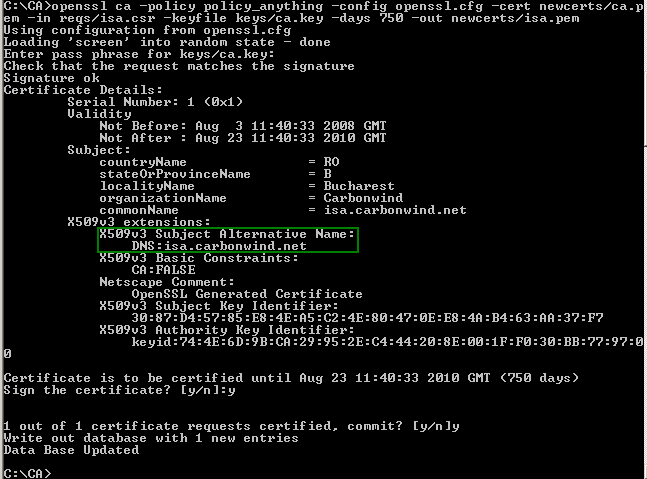
And now we will sign ISA's certificate, see Figure7. You will be prompted to enter the password for the CA's private key.
openssl ca -policy policy_anything -config openssl.cfg -cert newcerts/ca.pem -in reqs/isa.csr -keyfile keys/ca.key -days 750 -out newcerts/isa.pem
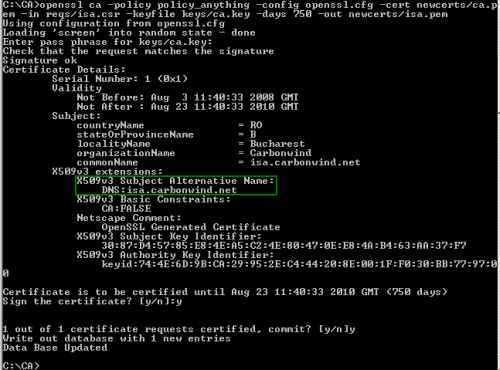
Figure7: Sign ISA's Certificate
And after these steps we have a certificate along with its correponding private key for ISA.
Now edit the openssl.cfg file and comment (add the #) the subjectAltName line, see Figure8.
Then save the changes made.
We do not need a SAN entry for the Mac OS X VPN clients.
If you forget to do this change, you will continue to issue certificates which contain the SAN field.
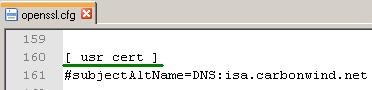
Figure8: Commented: line subjectAltName=DNS:isa.carbonwind.net
4. Create a Certificate for a Mac VPN Client Called For Example macx
So by now we have a certificate for the VPN server.
Let's issue a couple of certificates for the Mac VPN clients. I will use a 750 days valability period for the Macs' certificates.
First for a client named macx.
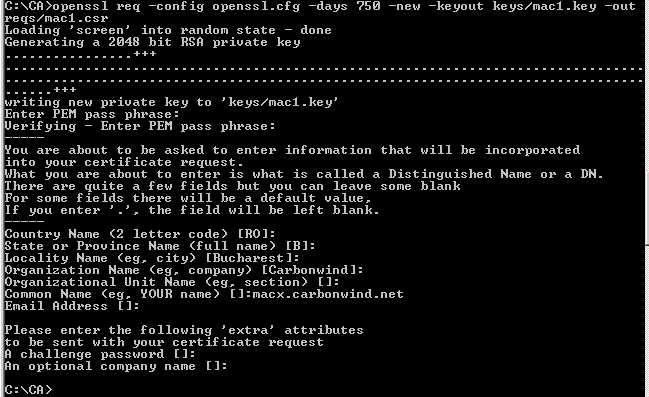
Generate macx's RSA private key(the default 2048-bit value will be used) and the CSR, see Figure9. Enter a good password to protect the private key(3DES will be used to encrypt the private key). I've used the CN (common name) macx.carbonwind.net.
Because of the configured default values in the openssl.cfg, this is an easy and quick process.
openssl req -config openssl.cfg -days 750 -new -keyout keys/mac1.key -out reqs/mac1.csr
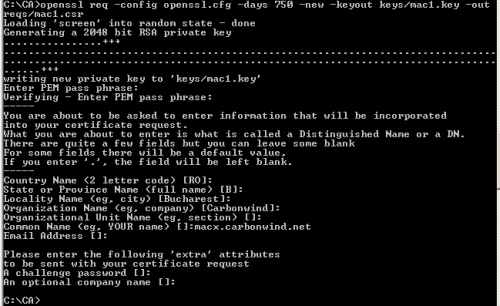
Figure9: Create Macx's CSR
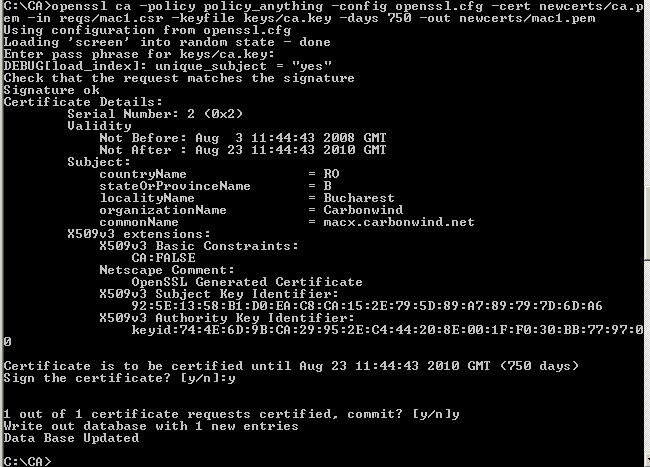
Sign macx's certificate, see Figure10. You will be prompted to enter the password for the CA's private key.
openssl ca -policy policy_anything -config openssl.cfg -cert newcerts/ca.pem -in reqs/mac1.csr -keyfile keys/ca.key -days 750 -out newcerts/mac1.pem
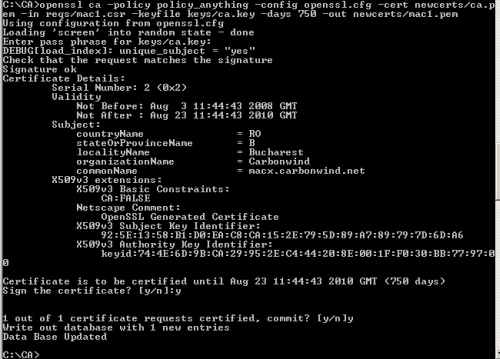
Figure10: Sign Macx's Certificate
5. Create a Certificate for a Mac VPN Client Called For Example macy
Repeat the above steps for the second Mac VPN client called macy.
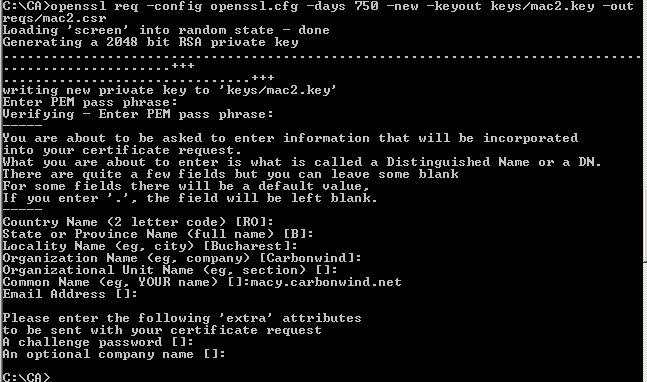
Generate macy's RSA private key(the default 2048-bit value will be used) and the CSR, see Figure11. Enter a password to protect the private key. I've used the CN (common name) macy.carbonwind.net.
openssl req -config openssl.cfg -days 750 -new -keyout keys/mac2.key -out reqs/mac2.csr
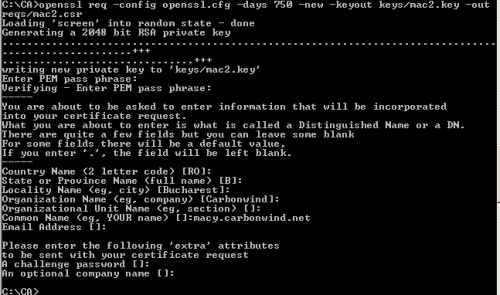
Figure11: Create Macy's CSR
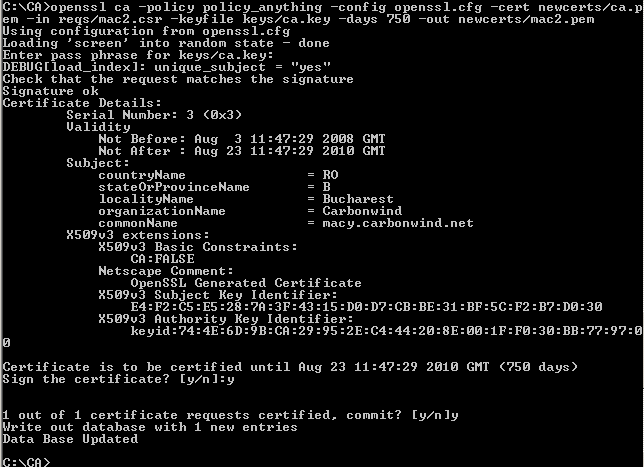
And now we will sign macy's certificate, see Figure12. You will be prompted to enter the password for the CA's private key.
openssl ca -policy policy_anything -config openssl.cfg -cert newcerts/ca.pem -in reqs/mac2.csr -keyfile keys/ca.key -days 750 -out newcerts/mac2.pem
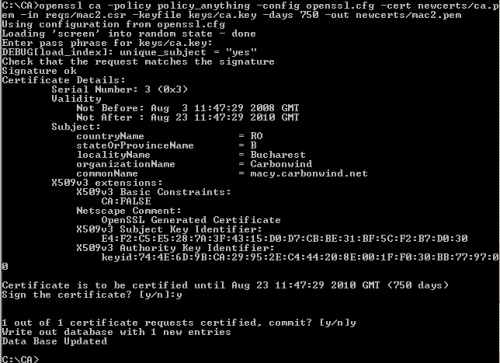
Figure12: Sign Macy's Certificate
6. Convert ISA's Certificate to PKCS #12 Format
We've generated our certificates.
But for example, we cannot import on ISA the certificate we've generated just the way it is right now.
So we're going to group into a PKCS #12 file ISA's certificate, ISA's private key and the CA certificate, see Figure13. You will be prompted to enter the password for ISA's private key.
Also, since we've included ISA's private key into the PKCS #12 file, enter a password to protect this private key(the export password).
openssl pkcs12 -export -in newcerts/isa.pem -inkey keys/isa.key -certfile newcerts/ca.pem -out export/isa.p12

Figure13: Export ISA's certificate along with its corresponding private key and CA's certificate into a PKCS #12 File
7. Convert macx's Certificate to PKCS #12 Format
We're going to repeat the above steps for macx's certificate, to group into a PKCS #12 file macx's certificate, macx's private key and the CA certificate, see Figure14. You will be prompted to enter the password for macx's private key. Again, since we've included macx's private key into the PKCS #12 file, enter a password to protect this private key(the export password).
openssl pkcs12 -export -in newcerts/mac1.pem -inkey keys/mac1.key -certfile newcerts/ca.pem -out export/mac1.p12

Figure14: Export macx's certificate along with its corresponding private key and CA's certificate into a PKCS #12 File
8. Convert macy's Certificate to PKCS #12 Format
And one more time, for macy, group into a PKCS #12 file macy's certificate, macy's private key and the CA certificate, see Figure15. You will be prompted to enter the password for macy's private key. Since we've included macy's private key into the PKCS #12 file, enter a password to protect this private key(the export password).
openssl pkcs12 -export -in newcerts/mac2.pem -inkey keys/mac2.key -certfile newcerts/ca.pem -out export/mac2.p12

Figure15: Export macy's certificate along with its corresponding private key and CA's certificate into a PKCS #12 File
9. Convert CA's Certificate from PEM to DER
We also need to import on ISA the CA's certificate. We've already included the CA certificate into ISA's PKCS #12 file, however it will be faster to just import the separate CA certificate, so I will convert the CA certificate from PEM(base64 encoding of the DER encoding) to DER, see Figure16.
openssl x509 -outform DER -in newcerts/ca.pem -out export/ca.cer

Figure16: Convert the CA Certificate from PEM to DER
10. Check the Export Folder
And in the export folder we have the files that need to be imported on ISA and on the Mac VPN clients, see Figure17.

Figure17: The Export Folder
11. Import on ISA the CA Certificate and ISA's Certificate
I've copied on ISA the ca.cer and isa.p12 files.
First I will import the CA certificate into the Trusted Root Certification Authorities, Certificates (Local Computer) store, see Figure18.
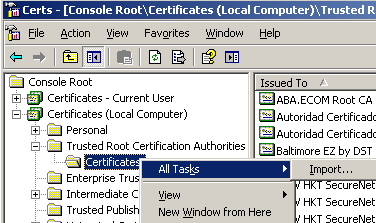
Figure18: Trusted Root Certification Authorities, Certificates (Local Computer) store: Import
Click Next on the Welcome to the Certificate Import Wizard, see Figure19.
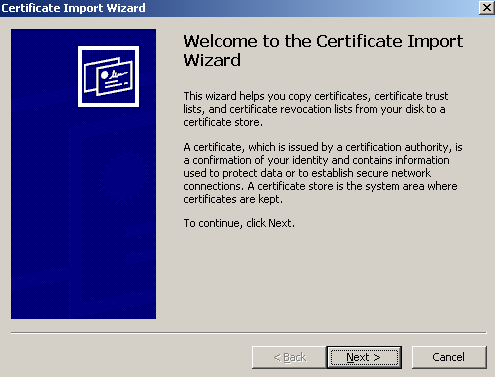
Figure19: Import CA Certificate on ISA - Welcome to the Certificate Import Wizard
Select the CA certificate to be imported, see Figure20.
Click Next.

Figure20: Import CA Certificate on ISA - Select the CA Certificate
Choose Place all certificates in the following stored, the Trusted Root Certification Authorities store being by default selected, see Figure21.
Click Next.
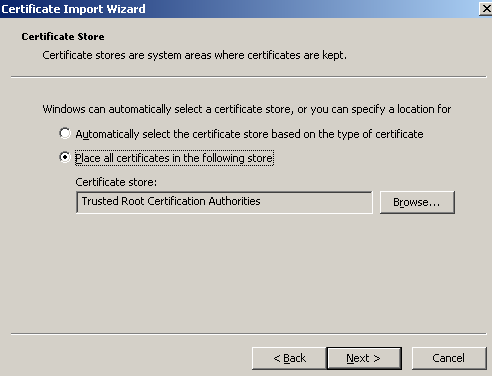
Figure21: Import CA Certificate on ISA - Select The Certificate Store
And click Finish, see Figure22.
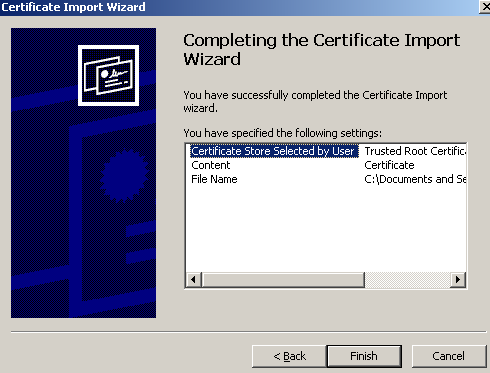
Figure22: Import CA Certificate on ISA - Finish
A quick look at the imported CA certificate, see Figure23.
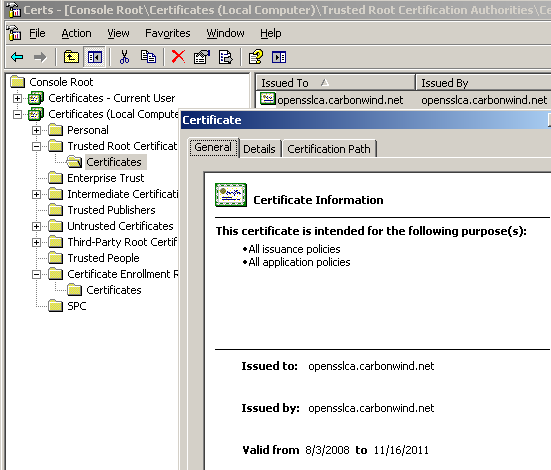
Figure23: Imported CA Certificate
And now let's import ISA's certificate into the Personal, Certificates (Local Computer) store, see Figure24.
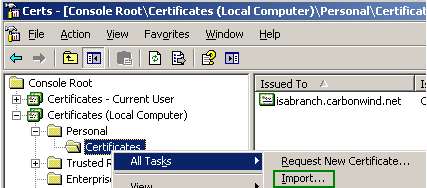
Figure24: Personal, Certificates (Local Computer) store: Import
Click Next on the Welcome to the Certificate Import Wizard, see Figure25.
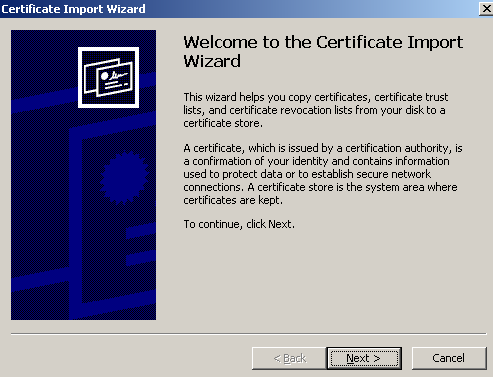
Figure25: Import ISA's Certificate - Welcome to the Certificate Import Wizard
Select ISA's certificate to be imported, see Figure26.
Click Next.
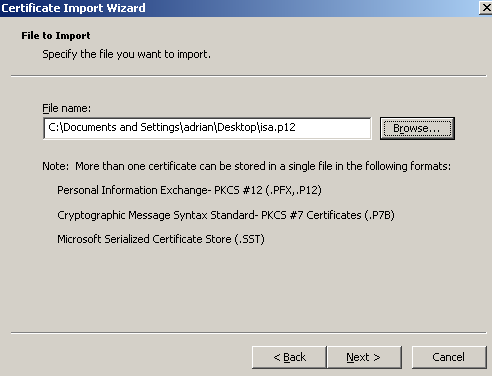
Figure26: Import ISA's Certificate - Select ISA's Certificate
Enter the password protecting the private key (the export password you've entered with OpenSSL), see Figure27.
Click Next.
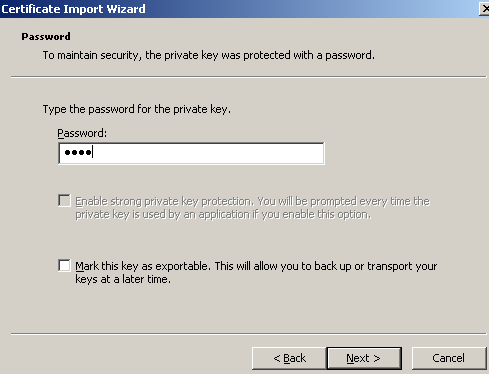
Figure27: Import ISA's Certificate - Enter the Password of the .p12 file
Choose Place all certificates in the following stored, the Personal store being by default selected, see Figure28.
Click Next.
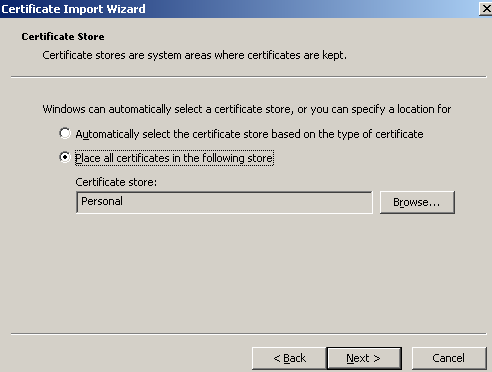
Figure28: Import CA Certificate on ISA - Select Certificate Store
And click Finish, see Figure29.
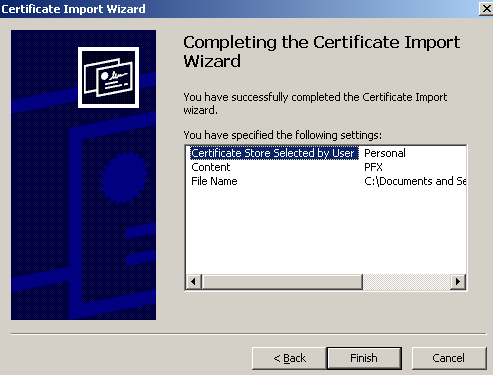
Figure29: Import CA Certificate on ISA - Finish
A quick look at the certificates imported on ISA, see Figure30.
As can be noted the CA certificate was also placed into the Personal, Certificates (Local Computer) store. We can delete it, we don't need it here.

Figure30: Personal, Certificates (Local Computer) store - Imported Certificates
If we analyze ISA's certificate, we can view that it has a corresponding private key, see Figure31.
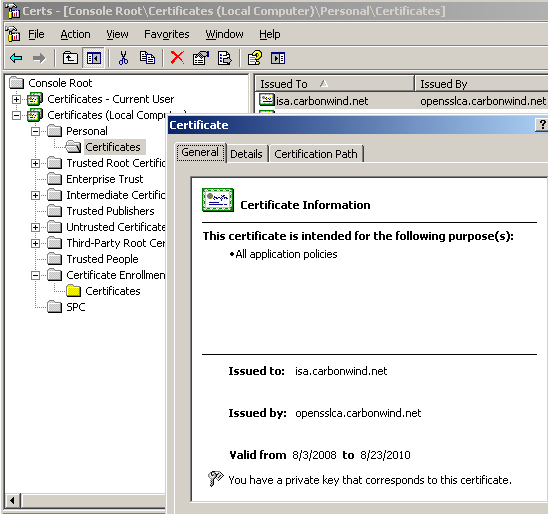
Figure31: Personal, Certificates (Local Computer) store - ISA's Certificate: General Tab
Also the required SAN field is present, see Figure32.
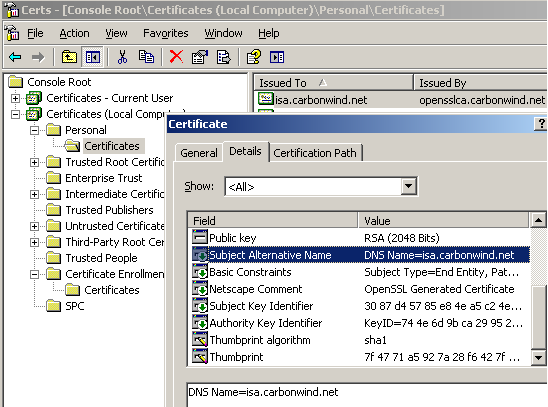
Figure32: Personal, Certificates (Local Computer) store - ISA's Certificate: Detail Tab
We're not done yet with ISA's configuration.
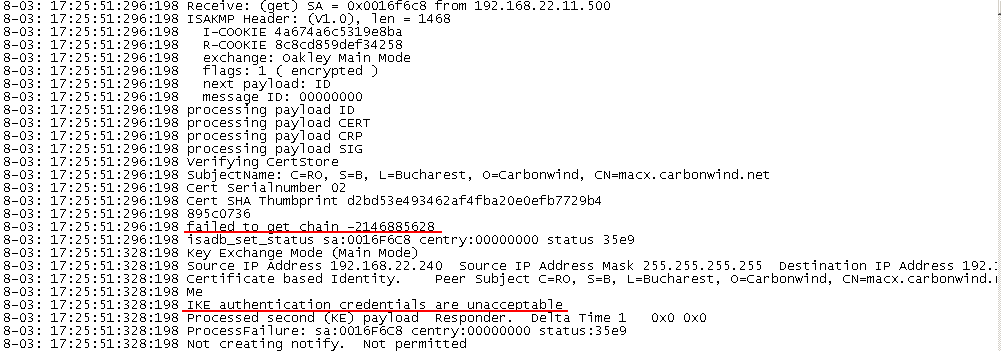
If an L2TP/IPsec client will connect at this moment, using one of the two certificates we've issued for the VPN clients, the connection will fail.
If we look at the Oakley.log on ISA, we'll notice that the error "failed to get chain -2146885628" appears, see Figure33.
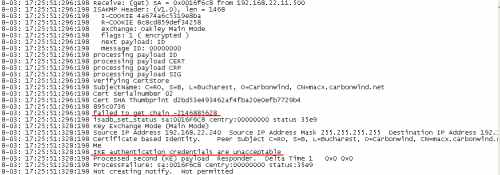
Figure33: Oakley.log on ISA - Error "failed to get chain -2146885628"
A quick solution to this is to reboot ISA.
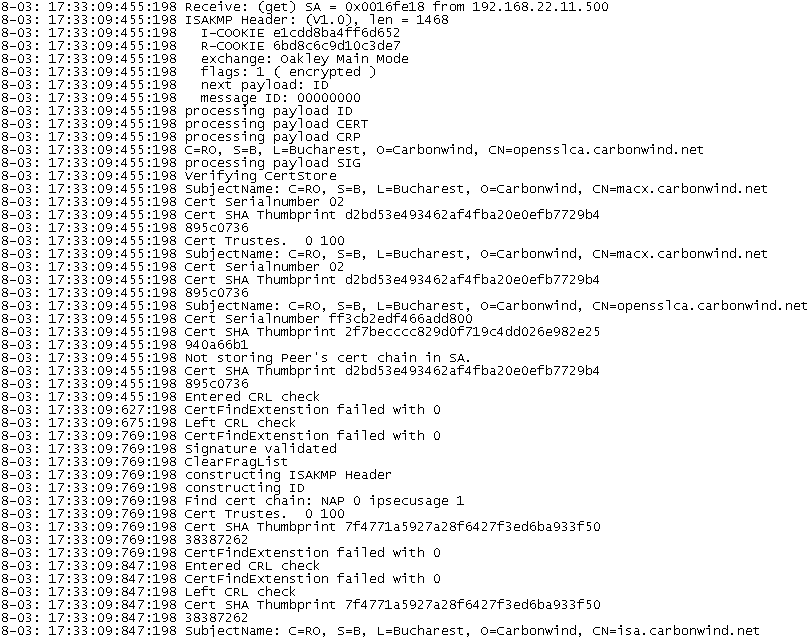
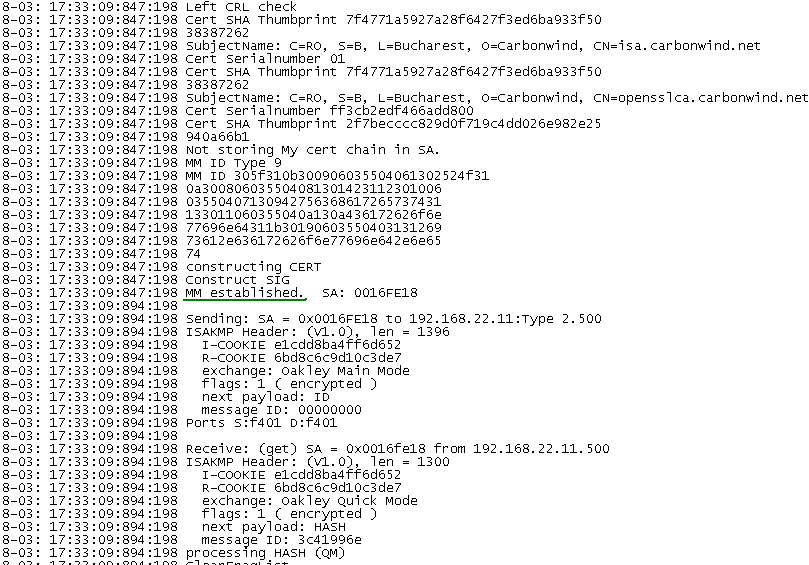
It did the trick for me, see Figure34 and Figure35. I've tested on two different ISA Server 2006 SE installed on Windows Server 2003 Standard R2 SP2. Same story. The reboot fixed this problem.
Actually I recommend you to do a first test using a Windows L2TP/IPsec VPN client. For example, I've used a Windows XP SP3 machine. Once I saw that ISA is configured correctly, I've made a test with a Mac OS X L2TP/IPsec VPN client.

Figure34: Oakley.log on ISA - Success: Part1

Figure35: Oakley.log on ISA - Success: Part2
12. Create a CRL
There is one more thing we can do on ISA before moving and configure the Mac L2TP/IPsec VPN client: install a CRL (Certificates Revocation List).
We did not revoke any certificates yet, but it would be be useful to give ISA a CRL it can check.
You can skip this part if you want.
I've set the expiration period of the CRL to 730 days in the openssl.cfg file. Just to make sure there won't be any complaints because the CRL has expired. You can modify this value if you want, see Figure36.
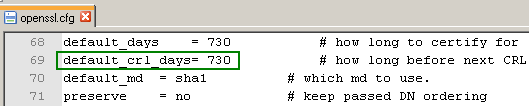
Figure36: openssl.cfg - default_crl_days
Generate the CRL, see Figure37.
openssl ca -policy policy_anything -config openssl.cfg -gencrl -out crl/crl.crl -cert newcerts/ca.pem -keyfile keys/ca.key

Figure37: Generate the CRL
13. Install the CRL on ISA
Copy the crl.crl file located in the crl folder, see Figure38, on ISA.
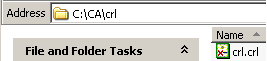
Figure38: CRL Folder
The CRL goes into the Intermediate Certification Authorities store, Certificates (Local Computer) on ISA, see Figure39.
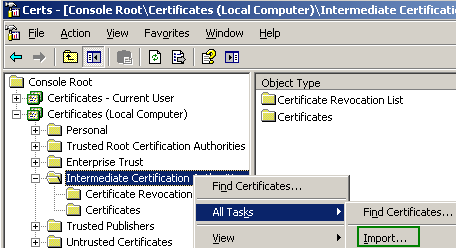
Figure39: Intermediate Certification Authorities store, Certificates (Local Computer) - Import
Click Next on the Welcome to the Certificate Import Wizard, see Figure40.
Figure40: CRL Import on ISA - Welcome to the Certificate Import Wizard
Select the CRL file, see Figure41.
Click Next.
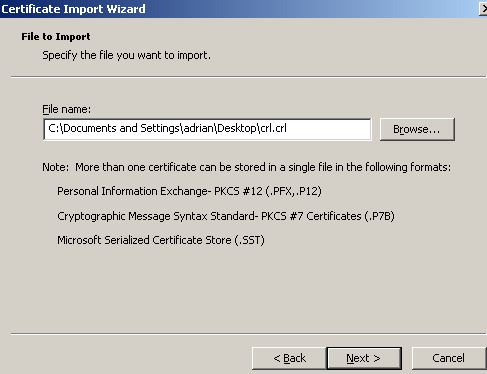
Figure41: CRL Import on ISA - Select the CRL File
Leave the default option in place, Place all certificates in the following store, Intermediate Certification Authorities, see Figure42.
Click Next.
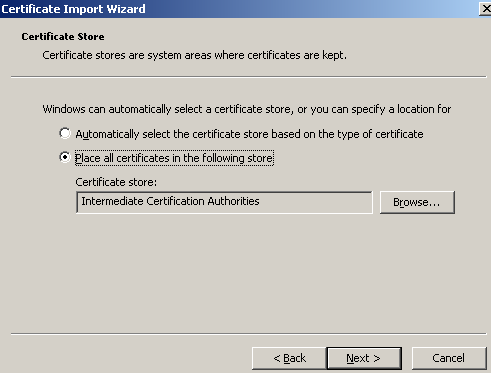
Figure42: CRL Import on ISA - Place all certificates in the following store, Intermediate Certification Authorities
And click Finish, see Figure43.
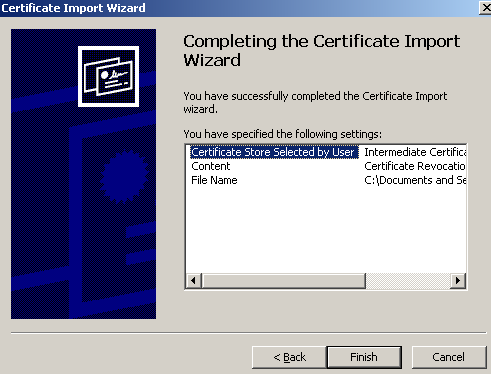
Figure43: CRL Import on ISA - Finish
Let's take a look at the CRL imported on ISA, see Figure44.
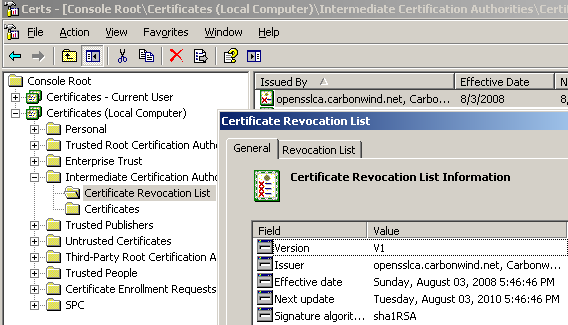
Figure44: The CRL Imported on ISA
And we're done for now with ISA.
14. Import the Certificate Used for IKE Authentication on the Mac OS X
Time to import on a Mac OS X machine one of the certificates we've created for the Mac OS X L2TP/IPsec VPN clients. I will import macx's certificate.
We've already covered the process of importing a certificate on the Mac in the first part of this article.
So there is no point in discussing it in detail one more time.
Launch the Keychain Access utility using sudo:
sudo "/Applications/Utilities/Keychain Access.app/Contents/MacOS/Keychain Access"
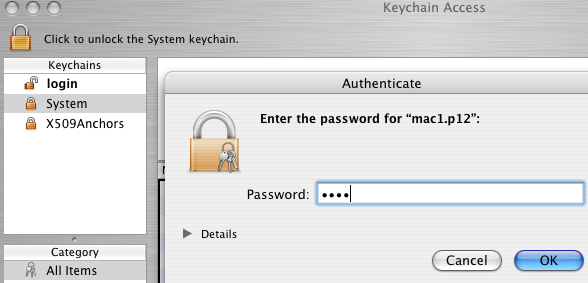
I've simply dragged the .p12 file into the Keychain Access, System window. You will be prompted for the password of the .p12 file(the export password you've entered with OpenSSL), see Figure45.

Figure45: Keychain Access - System Keychain: Enter Password for mac1.p12
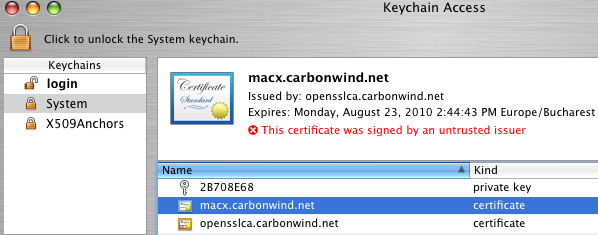
And the client's certificate along with its corresponding private key and the CA certificate were imported into the System Keychain, see Figure46.
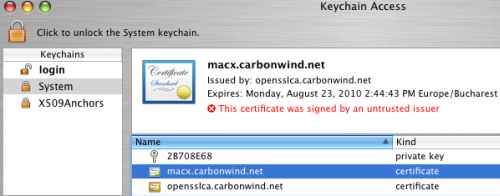
Figure46: System Keychain - Imported Files
The client's certificate along with its corresponding private key are in the correct keychain.
However the CA certificate must be in the X509Anchors keychain.
Simply drag the CA certificate into the X509Anchors keychain, see Figure47.
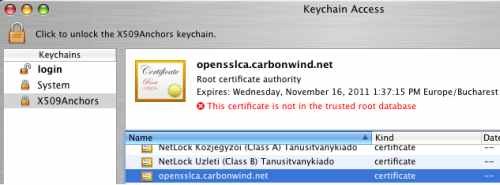
Figure47: X509Anchors Keychain - CA Certificate
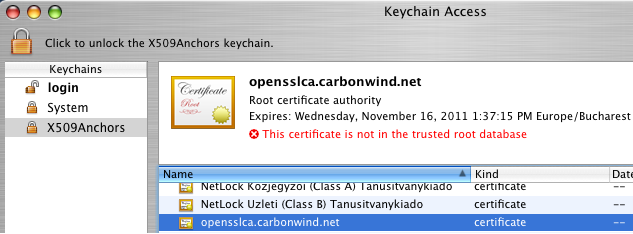
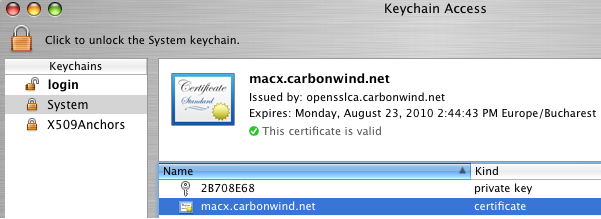
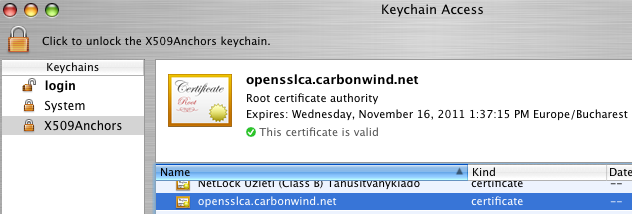
As can be noted from Figure46 and Figure47, the certificates imported on the Mac are not yet valid. Close and re-open the Keychain Access utility. If needed, reboot the Mac machine.
The client and CA certificates should appear now as valid, see Figure48 and Figure49.
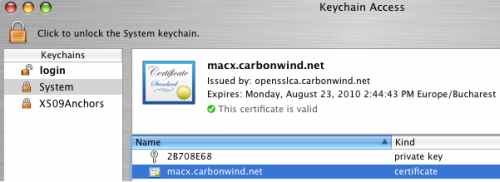
Figure48: System Keychain - Valid Client Certificate
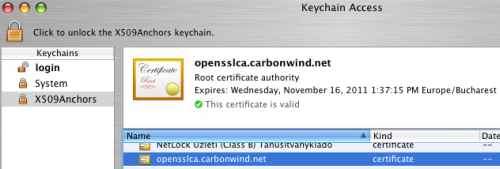
Figure49: X509Anchors Keychain - Valid CA Certificate
15. Configure the L2TP/IPsec VPN Connection on the Mac OS X
I've configured the L2TP/IPsec connection on the Mac VPN client, see Figure50.
Note that the server address matches the FQDN from ISA's certificate SAN field.
I've selected the machine authentication certificate.
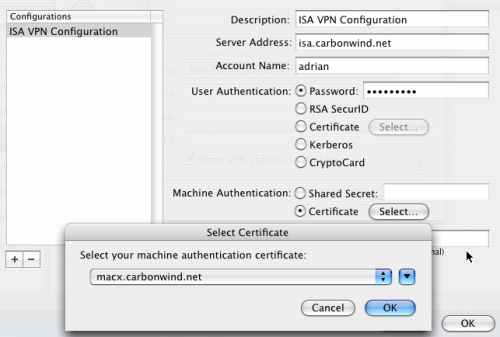
Figure50: Mac OS X - Configure the L2TP/IPsec Connection
Since we are using a FQDN as the VPN server address, we need to make sure that the Mac can resolve this name, so I've added the required entry in its etc/hosts file, see Figure51.
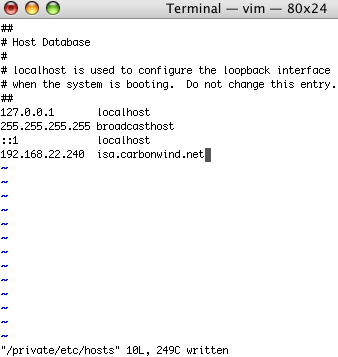
Figure51: etc/hosts file
I've clicked the Connect button of the L2TP/IPsec VPN connection on the Mac, and I'm connected, see Figure52.
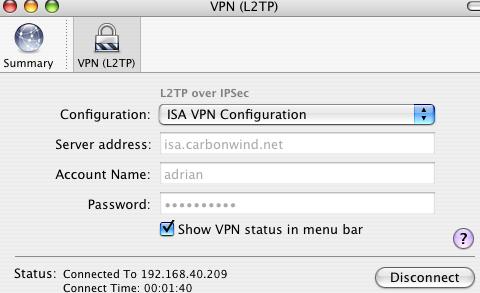
Figure52: Mac - L2TP/IPsec VPN Connection Connected
16. Revoke a Client's Certificate, Create a New CRL and Import This New CRL on ISA
You may want to revoke a client's certificate.
For example I will revoke the macx's certificate, see Figure53.
openssl ca -policy policy_anything -config openssl.cfg -revoke newcerts/mac1.pem -keyfile keys/ca.key -cert newcerts/ca.pem

Figure53: Revoke macx's Certificate
And create a new CRL to import on ISA, in order to inform ISA that the macx's certificate was revoked, thus is no longer valid, see Figure54.
openssl ca -policy policy_anything -config openssl.cfg -gencrl -out crl/crl_new.crl -cert newcerts/ca.pem -keyfile keys/ca.key

Figure54: Issue a New CRL After The Client Certificate Was Revoked
Delete the old CRL from the Certificates (Local Computer), Intermediate Root Certification Authorities store and import the new one, see Figure55 and Figure56.

Figure55: ISA - Import The New CRL into the Certificates (Local Computer), Intermediate Root Certification Authorities Store
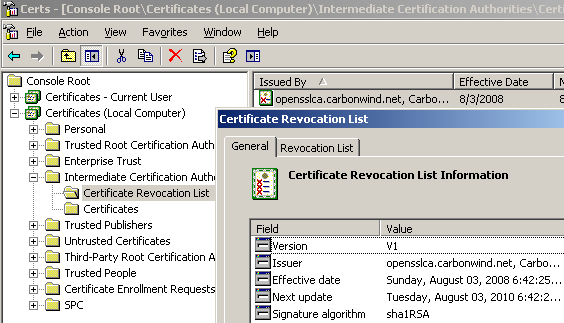
Figure56: ISA - Certificates (Local Computer), Intermediate Root Certification Authorities Store: New CRL
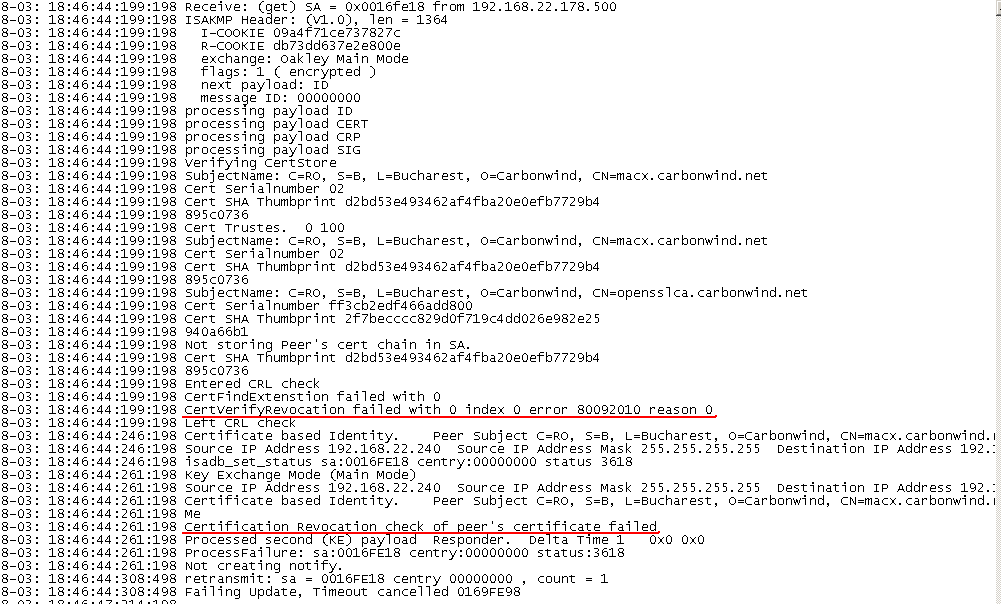
If I will connect now from the Mac client with the macx certificate installed.
IKE authentication will fail on ISA, the certificate presented by the VPN client did not pass the CRL checks. The Oakley.log on ISA shows this, see Figure57.
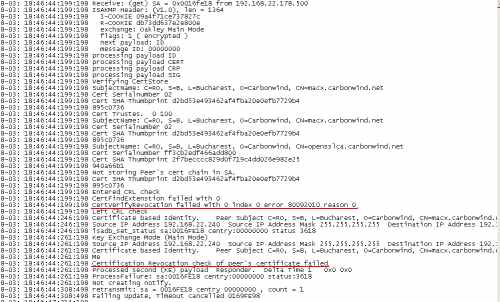
Figure57: ISA - Oakley.log: CRL Checks Failed
|