|
24.07.2009
Vyatta VC5 - Apply NAT Policies over IPsec Tunnel Mode Site-to-Site VPN Traffic: Part 1 - A Simple Scenario
- 1. Intro
- 2. Configuration of the left Vyatta
2.1. Basic configuration
2.2. NAT rules
2.3. VPN configuration
- 3. Configuration of the right Vyatta
3.1. Basic configuration
3.2. NAT rules
3.3. VPN configuration
- 4. Monitor the NAT rules
- 5. Monitor the s2s VPN
1. Intro
I don't know what's Vyatta's marketing term for this, but in the bellow lines we will apply NAT policies over IPsec tunnel mode s2s VPN traffic using Vyatta VC5.
Please note that although many VPN gateways are today integrated into a device that also incorporates a firewall, IPS, VPN server, etc, and such devices may support
various NAT rules, that does not mean they will have the ability to apply advanced NAT policies over the s2s VPN traffic.
Typically, a VPN gateway may be a able to NAT the s2s VPN traffic using the IP address configured on its external interface(interface which terminates the s2s).
So please check that with your third-party VPN gateway vendor if you want to do the same on this remote VPN gateway.
These advanced NAT policies can help for example in the overlapped subnets scenario(which we will discuss in part 2 of this article), or just to mask the subnets behind
the VPN gateways in a business-to-business scenario(we will do that in the bellow lines).
So, say you have a subnet behind a Vyatta VC5 router, left Vyatta on Figure1, 192.168.40.0/24, and an IPsec tunnel mode s2s VPN between this router and a remote router. For convenience, within the
bellow lines the remote VPN gateway will be another Vyatta VC5(right Vyatta, the subnet behind it is 192.168.10.0/24), on which we will also apply NAT policies over the VPN IPsec s2s VPN traffic.
You want to mask the subnet behind Vyatta.
Clients behind left Vyatta need to access a few servers located on the remote site, and the clients located on the remote site need to access a few servers located behind left Vyatta.
Thus we will hide on left Vyatta the local subnet 192.168.40.0/24 as 192.168.210.0/24, local clients (192.168.40.100-192.168.40.200) being masked as 192.168.210.192/29 and local
servers(192.168.40.10 and 192.168.40.11) as 192.168.210.10 and 192.168.210.11(we have assumed we have two servers behind Vyatta that need to be accessed by the clients located on the remote site).
We used a pool of IP addresses to mask the local clients, but we could have just used a single IP address to do that.
Please note that none of left Vyatta's physical interfaces has an IP address from the 192.168.210.0/24 subnet as we don't really need that.
We will also do the same on the right Vyatta on Figure1, and hide the local subnet 192.168.10.0/24 as 192.168.110.0/24, so that in the end, a VPN
gateway and the clients behind it to be unaware of the real IP addresses behind the remote VPN gateway.
On right Vyatta, local clients (192.168.10.100-192.168.10.200) being masked as 192.168.110.128/29 and local servers(192.168.10.2 and 192.168.10.3) as 192.168.110.2 and
192.168.110.3(we have assumed we have two servers behind right Vyatta that need to be accessed by the clients located on the remote site).
We used a pool of IP addresses to mask the local clients, but we could have just used a single IP address to do that.
Please note that none of right Vyatta's physical interfaces has an IP address from the 192.168.110.0/24 subnet as we don't really need that.
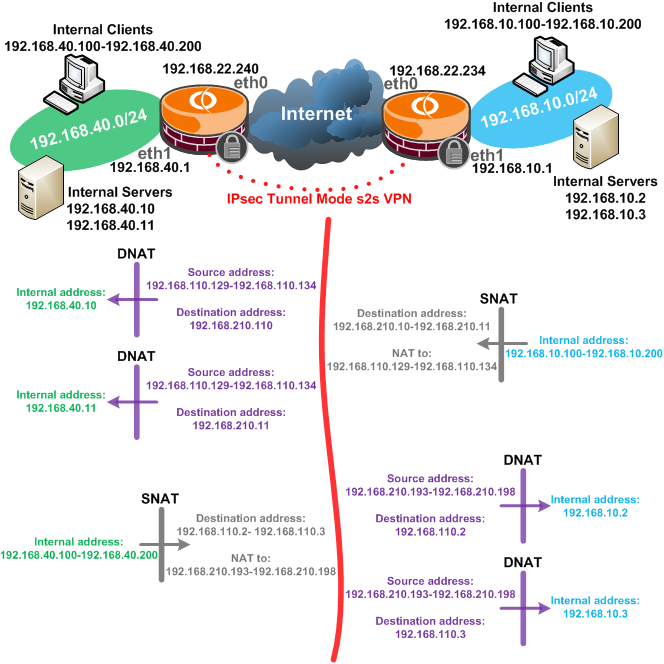
Figure1: Network Diagram
2. Configuration of the left Vyatta
Let's configure first the left Vyatta.
2.1. Basic configuration
And configure basic stuff like the interfaces, add a default route, set the system host name and maybe enable SSH so that we can easily copy and paste our configuration lines.
set interfaces ethernet eth0 address 192.168.22.240/24
set interfaces ethernet eth1 address 192.168.40.1/24
set service ssh protocol-version 2
set protocols static route 0.0.0.0/0 next-hop 192.168.22.1
set system host-name r1
commit
2.2. NAT rules
Time to set the NAT rules.
First make sure the internal servers are hidden behind the needed IP addresses.
We will use DNAT rules to address incoming traffic from the clients located on the remote site destined to the local servers.
Clients located on the remote site are seen on local Vyatta as belonging to the 192.168.110.129-192.168.110.134 range of IP addresses.
Clients located on the remote site see server 192.168.40.10 as 192.168.210.10, so when traffic from 192.168.110.129-192.168.110.134 destined to 192.168.210.10 arrives on local Vyatta through the VPN
tunnel, we will make the needed translations with rule 10.
Similarly, clients located on the remote site see server 192.168.40.11 as 192.168.210.11, so when traffic from 192.168.110.129-192.168.110.134 destined to 192.168.210.11 arrives on local Vyatta through the VPN
tunnel, we will make the needed translations with rule 15.
set service nat rule 10 type destination
set service nat rule 10 source address 192.168.110.129-192.168.110.134
set service nat rule 10 destination address 192.168.210.10
set service nat rule 10 inbound-interface eth0
set service nat rule 10 inside-address address 192.168.40.10
set service nat rule 15 type destination
set service nat rule 15 source address 192.168.110.129-192.168.110.134
set service nat rule 15 destination address 192.168.210.11
set service nat rule 15 inbound-interface eth0
set service nat rule 15 inside-address address 192.168.40.11
Next, we will use a SNAT rule, rule 20, to mask the local clients, 192.168.40.100-192.168.40.200, as 192.168.210.193-192.168.210.198 when accessing the remote servers 192.168.110.2
and 192.168.110.2.
set service nat rule 20 type source
set service nat rule 20 source address 192.168.40.100-192.168.40.200
set service nat rule 20 outbound-interface eth0
set service nat rule 20 destination address 192.168.110.2-192.168.110.3
set service nat rule 20 outside-address address 192.168.210.193-192.168.210.198
And finally, add a "regular" NAT rule, a SNAT rule for the subnet behind the local Vyatta, so that machines behind it to be able to access the Internet, rule 100
(since we have only a single IP address on the eth0 interface, we could have used a Masquerade rule instead of the SNAT rule).
set service nat rule 100 type source
set service nat rule 100 source address 192.168.40.0/24
set service nat rule 100 outbound-interface eth0
set service nat rule 100 outside-address address 192.168.22.240
commit
2.3. VPN configuration
Now we move on and configure the IPsec tunnel mode s2s VPN.
Specify the ipsec interface:
set vpn ipsec ipsec-interfaces interface eth0
Create the IKE MM proposal:
set vpn ipsec ike-group IKE1 proposal 1
set vpn ipsec ike-group IKE1 proposal 1 encryption aes128
set vpn ipsec ike-group IKE1 proposal 1 hash sha1
set vpn ipsec ike-group IKE1 proposal 1 dh-group 5
set vpn ipsec ike-group IKE1 lifetime 28800
Create the IKE QM proposal:
set vpn ipsec esp-group ESP1 proposal 1
set vpn ipsec esp-group ESP1 proposal 1 encryption aes128
set vpn ipsec esp-group ESP1 proposal 1 hash sha1
set vpn ipsec esp-group ESP1 pfs
set vpn ipsec esp-group ESP1 lifetime 3600
Create a vpn ipsec site-to-site for the remote peer, specifying the authentication method used(pre-shared key), the IKE MM and QM proposals to be used, and the proxy ids
(local and remote subnets).
Note that we have four tunnels, as we have multiple local and remote subnets, and all these local and remote subnets comprise only the IP addresses used to hide the real
IP addresses behind the VPN gateways:
- tunnel 1 is for the traffic between the subnet 192.168.210.192/29 used to mask the local clients and the first remote server seen on the local Vyatta as
192.168.110.2.
- tunnel 2 is for the traffic between the subnet 192.168.210.192/29 used to mask the local clients and the second remote server seen on the local Vyatta as
192.168.110.3.
- tunnel 3 is for the traffic between the IP address 192.168.210.10 used to mask the first local server and the clients located on the remote site seen on local Vyatta as
192.168.110.128/29.
- tunnel 4 is for the traffic between the IP address 192.168.210.11 used to mask the second local server and the clients located on the remote site seen on local Vyatta as
192.168.110.128/29.
edit vpn ipsec site-to-site peer 192.168.22.234
set authentication mode pre-shared-secret
set authentication pre-shared-secret 12345
set ike-group IKE1
set local-ip 192.168.22.240
set tunnel 1 local-subnet 192.168.210.192/29
set tunnel 1 remote-subnet 192.168.110.2/32
set tunnel 1 esp-group ESP1
set tunnel 2 local-subnet 192.168.210.192/29
set tunnel 2 remote-subnet 192.168.110.3/32
set tunnel 2 esp-group ESP1
set tunnel 3 local-subnet 192.168.210.10/32
set tunnel 3 remote-subnet 192.168.110.128/29
set tunnel 3 esp-group ESP1
set tunnel 4 local-subnet 192.168.210.11/32
set tunnel 4 remote-subnet 192.168.110.128/29
set tunnel 4 esp-group ESP1
top
commit
3. Configuration of the right Vyatta
We can now move and configure the right Vyatta.
3.1. Basic configuration
And configure basic stuff like the interfaces, add a default route, set the system host name and maybe enable SSH so that we can easily copy and paste our configuration lines.
set interfaces ethernet eth0 address 192.168.22.234/24
set interfaces ethernet eth1 address 192.168.10.1/24
set service ssh protocol-version 2
set protocols static route 0.0.0.0/0 next-hop 192.168.22.1
set system host-name r2
commit
3.2. NAT rules
Set the NAT rules.
First make sure the internal servers are hidden behind the needed IP addresses.
We will use DNAT rules to address incoming traffic from the clients located on the remote site destined to the local servers.
Clients located on the remote site are seen on local Vyatta as belonging to the 192.168.210.193-192.168.210.198 range of IP addresses.
Clients located on the remote site see server 192.168.10.2 as 192.168.110.2, so when traffic from 192.168.210.193-192.168.210.198 destined to 192.168.110.2 arrives on local Vyatta through the VPN
tunnel, we will make the needed translations with rule 10.
Similarly, clients located on the remote site see server 192.168.10.3 as 192.168.110.3, so when traffic from 192.168.210.193-192.168.210.198 destined to 192.168.110.3 arrives on local Vyatta through the
VPN tunnel, we will make the needed translations with rule 15.
set service nat rule 10 type destination
set service nat rule 10 source address 192.168.210.193-192.168.210.198
set service nat rule 10 destination address 192.168.110.2
set service nat rule 10 inbound-interface eth0
set service nat rule 10 inside-address address 192.168.10.2
set service nat rule 15 type destination
set service nat rule 15 source address 192.168.210.193-192.168.210.198
set service nat rule 15 destination address 192.168.110.3
set service nat rule 15 inbound-interface eth0
set service nat rule 15 inside-address address 192.168.10.3
Next, we will use a SNAT rule, rule 20, to mask the local clients, 192.168.10.100-192.168.10.200, as 192.168.110.129-192.168.110.134 when accessing the remote servers
192.168.210.10 and 192.168.210.11.
set service nat rule 20 type source
set service nat rule 20 source address 192.168.10.100-192.168.10.200
set service nat rule 20 outbound-interface eth0
set service nat rule 20 destination address 192.168.210.10-192.168.210.11
set service nat rule 20 outside-address address 192.168.110.129-192.168.110.134
And finally, add a "regular" NAT rule, a SNAT rule for the subnet behind the local Vyatta, so that machines behind it to be able to access the Internet, rule 100
(since we have only a single IP address on the eth0 interface, we could have used a Masquerade rule instead of the SNAT rule).
set service nat rule 100 type source
set service nat rule 100 source address 192.168.10.0/24
set service nat rule 100 outbound-interface eth0
set service nat rule 100 outside-address address 192.168.22.234
commit
3.3. VPN configuration
Now we move on and configure the IPsec tunnel mode s2s VPN.
Specify the ipsec interface:
set vpn ipsec ipsec-interfaces interface eth0
Create the IKE MM proposal:
set vpn ipsec ike-group IKE1 proposal 1
set vpn ipsec ike-group IKE1 proposal 1 encryption aes128
set vpn ipsec ike-group IKE1 proposal 1 hash sha1
set vpn ipsec ike-group IKE1 proposal 1 dh-group 5
set vpn ipsec ike-group IKE1 lifetime 28800
Create the IKE QM proposal:
set vpn ipsec esp-group ESP1 proposal 1
set vpn ipsec esp-group ESP1 proposal 1 encryption aes128
set vpn ipsec esp-group ESP1 proposal 1 hash sha1
set vpn ipsec esp-group ESP1 pfs
set vpn ipsec esp-group ESP1 lifetime 3600
Create a vpn ipsec site-to-site for the remote peer, specifying the authentication method used(pre-shared key), the IKE MM and QM proposals to be used, and the proxy ids
(local and remote subnets).
Note that we have four tunnels, as we have multiple local and remote subnets, and all these local and remote subnets comprise only the IP addresses used to hide the real
IP addresses behind the VPN gateways:
- tunnel 1 is for the traffic between the subnet 192.168.110.128/29 used to mask the local clients and the first remote server seen on the local Vyatta as
192.168.210.10.
- tunnel 2 is for the traffic between the subnet 192.168.110.128/29 used to mask the local clients and the second remote server seen on the local Vyatta as
192.168.210.11.
- tunnel 3 is for the traffic between the IP address 192.168.110.2 used to mask the first local server and the clients located on the remote site seen on local Vyatta as
192.168.210.192/29.
- tunnel 4 is for the traffic between the IP address 192.168.110.3 used to mask the second local server and the clients located on the remote site seen on local Vyatta as
192.168.210.192/29.
edit vpn ipsec site-to-site peer 192.168.22.240
set authentication mode pre-shared-secret
set authentication pre-shared-secret 12345
set ike-group IKE1
set local-ip 192.168.22.234
set tunnel 1 local-subnet 192.168.110.128/29
set tunnel 1 remote-subnet 192.168.210.10/32
set tunnel 1 esp-group ESP1
set tunnel 2 local-subnet 192.168.110.128/29
set tunnel 2 remote-subnet 192.168.210.11/32
set tunnel 2 esp-group ESP1
set tunnel 3 local-subnet 192.168.110.2/32
set tunnel 3 remote-subnet 192.168.210.192/29
set tunnel 3 esp-group ESP1
set tunnel 4 local-subnet 192.168.110.3/32
set tunnel 4 remote-subnet 192.168.210.192/29
set tunnel 4 esp-group ESP1
top
commit
4. Monitor the NAT rules
There are a couple of commands that can help us display info related to NAT. Let's take a quick look.
We can view the active NAT translations using the show nat translations and show nat translations detail commands,
see Figure2 and Figure3.
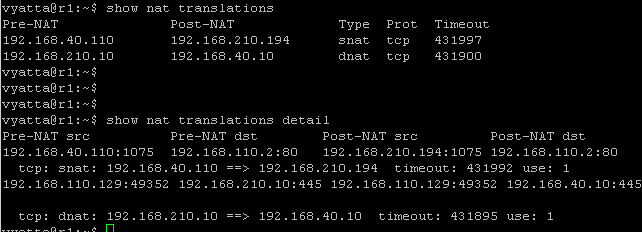
Figure2: Left Vyatta - show nat translations (+details)
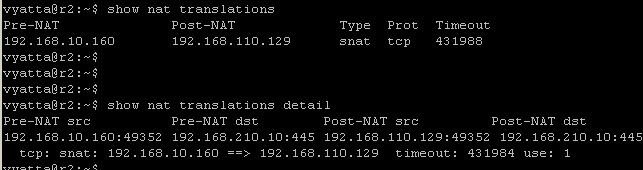
Figure3: Right Vyatta - show nat translations (+details)
We can quickly view the NAT statistics using the show nat statistics command, see Figure4 and Figure5.
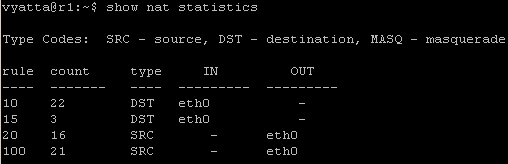
Figure4: Left Vyatta - show nat statistics
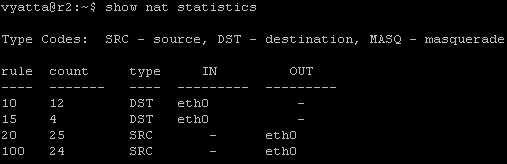
Figure5: Right Vyatta - show nat statistics
5. Monitor the s2s
There are a couple of commands that can help us display info related to our s2s. Let's take a quick look.
We can start by displaying summary information about the IKE process with the show ike ipsec status command, see Figure6 and Figure7.
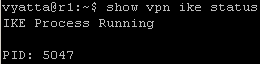
Figure6: Left Vyatta - show vpn ike status
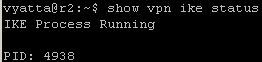
Figure7: Right Vyatta - show vpn ike status
And displaying information about the IPsec processes with the show vpn ipsec status command, see Figure8 and Figure9.
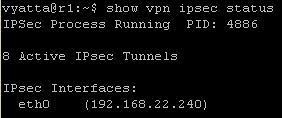
Figure8: Left Vyatta - show vpn ipsec status
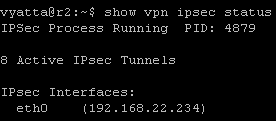
Figure9: Right Vyatta - show vpn ipsec status
Next we can check the IKE MM SAs with the show vpn ike sa command, see Figure10 and Figure11.

Figure10: Left Vyatta - show vpn ike sa

Figure11: Right Vyatta - show vpn ike sa
And we can check the IKE QM SAs with the show vpn ipsec sa command, see Figure12 and Figure13.
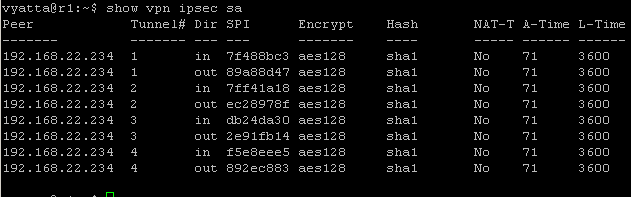
Figure12: Left Vyatta - show vpn ipsec sa
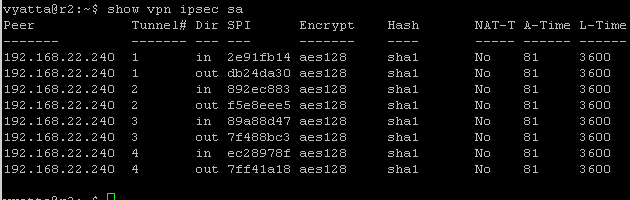
Figure13: Right Vyatta - show vpn ipsec sa
If we want more details about each IKE QM SAs we can use the show vpn ipsec sa detail command, see Figure14 and Figure15.
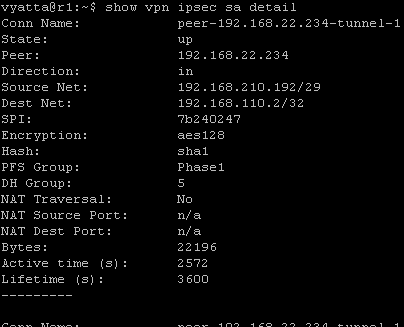
Figure14: Left Vyatta - show vpn ipsec sa detail
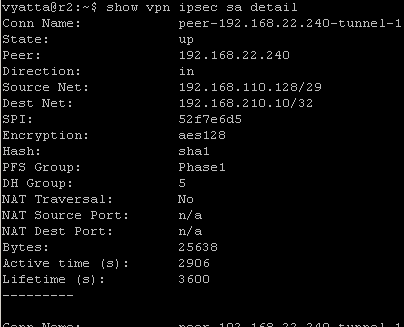
Figure15: Right Vyatta - show vpn ipsec sa detail
We can quickly view the IPsec SAs statistics using the show vpn ipsec sa statistics command, see Figure16 and Figure17.
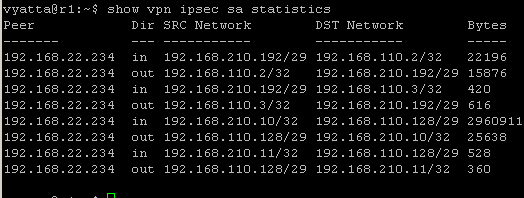
Figure16: Left Vyatta - show vpn ipsec sa statistics
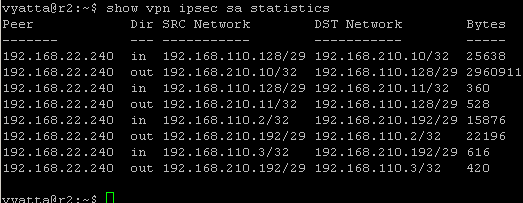
Figure17: Right Vyatta - show vpn ipsec sa statistics
|