|
07.04.2011
Configure Vyatta(Core 6.2) as an OpenVPN server(in routing mode) using for the PKI part XCA instead of easy-rsa
- 1. Intro
- 2. Configure Vyatta
- 3. Sample OpenVPN client on Windows(XP SP3 used)
1. Intro
In this paper we will configure Vyatta(Core 6.2) as an OpenVPN server(in routing mode) using for the PKI part XCA instead of easy-rsa.
We will do so per my previous article Using XCA to configure the OpenVPN PKI part as an alternative to OpenVPN's easy-rsa.
So first make sure you follow the steps from there in order to create a CA and issue certificates for the OpenVPN server and clients.
Per the mentioned paper, I have prepared within a folder on a Windows 7 machine the following files: CA certificate, DH parameter file, client and server certificates, client and server private keys, see Figure 1:
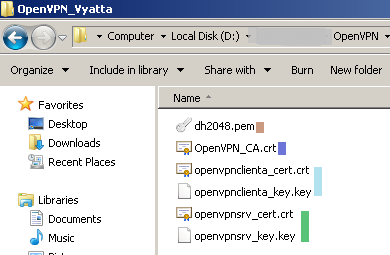
Figure1: XCA Exported Files
Make sure the server's private key is in SSLeay compatible format, otherwise you may not be able to commit the configuration on Vyatta.
2. Configure Vyatta
The network diagram is presented in Figure2:
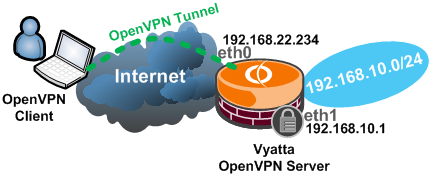
Figure2: Network Diagram
First simple configuration on the Vyatta machine(installed on hdd) to achieve basic connectivity.
This was entered on the Vyatta machine:
set interfaces ethernet eth0 address 192.168.22.234/24
set interfaces ethernet eth1 address 192.168.10.1/24
commit
set service ssh protocol-version v2
commit
save
set protocols static route 0.0.0.0/0 next-hop 192.168.22.1
commit
edit service nat rule 20
set type masquerade
set source address 192.168.10.0/24
set outbound-interface eth0
top
commit
save
We need to copy on Vyatta the CA certificate, the server certificate, the server private key and the DH parameter file.
Per Vyatta's configuration guide Vyatta_BasicSystemRef_R6.2_v01.pdf we can put these files within the /root location.
There are a couple of ways to do this; I will use WinSCP.
Note that, for example, the default administrator named vyatta is allowed to do sudo without being prompted with password.
So if we configure WinSCP, per its documentation, like in Figure3(use SCP and select the Advanced options) and Figure4(custom shell sudo su - on the SCP/Shell/ tab), we will be able to obtain write access to the /root location.
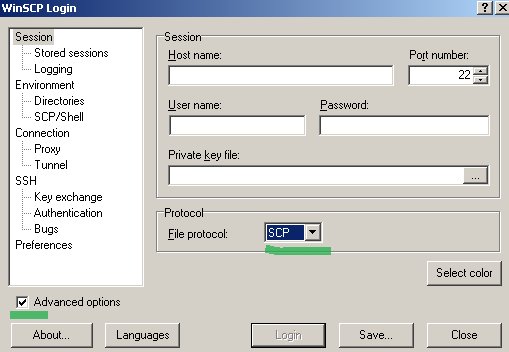
Figure3: WinSCP use SCP

Figure4: WinSCP custom shell
For example, I've copied the above mentioned files like so on the Vyatta machine, see Figure5:
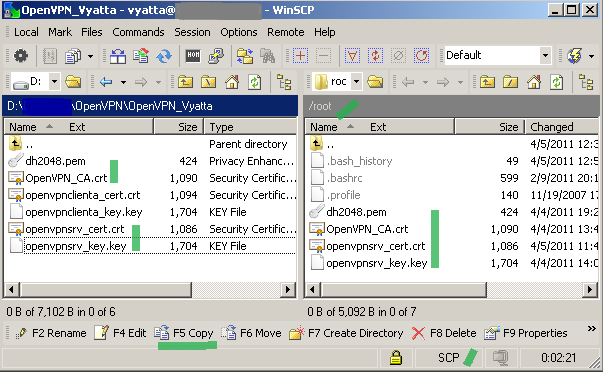
Figure5: WinSCP Files copied on the Vyatta machine over SCP
After we've copied these files on Vyatta, we can proceed and configure the OpenVPN server on it.
We will enter a basic OpenVPN configuration on Vyatta, it will use UDP and listen for VPN connections on UDP port 1194(default OpenVPN port), we will assign IP addresses to the OpenVPN clients from the 192.168.200.0/24 subnet and we will push a route for the subnet behind Vyatta(192.168.10.0/24) to the OpenVPN clients in order for them to be able to reach resources located behind Vyatta over the VPN tunnel.
Also we will use AES CBC 128-bit for data encryprion.
set interfaces openvpn vtun0
set interfaces openvpn vtun0 mode server
set interfaces openvpn vtun0 server subnet 192.168.200.0/24
set interfaces openvpn vtun0 tls ca-cert-file /root/OpenVPN_CA.crt
set interfaces openvpn vtun0 tls cert-file /root/openvpnsrv_cert.crt
set interfaces openvpn vtun0 tls key-file /root/openvpnsrv_key.key
set interfaces openvpn vtun0 tls dh-file /root/dh2048.pem
set interfaces openvpn vtun0 encryption aes128
set interfaces openvpn vtun0 server push-route 192.168.10.0/24
commit
save
3. Sample OpenVPN client on Windows(XP SP3 used)
I've copied on the client within the config folder the CA certificate, the client certificate and the client private key, see Figure 6:

Figure6: Windows XP SP 3 OpenVPN client config folder
The below client configuration is basic, we have some anti-MITM features, for example we verify the CN on the server's certificate and this certificate must have certain Key Usage and EKU values(for more details about this refer to the article Using XCA to configure the OpenVPN PKI part as an alternative to OpenVPN's easy-rsa).
client
dev tun
proto udp
remote 192.168.22.240 1194
resolv-retry infinite
nobind
persist-key
persist-tun
ca OpenVPN_CA.crt
cert openvpnclienta_cert.crt
key openvpnclienta_key.key
remote-cert-tls server
tls-remote "/CN=openvpnsrv"
cipher AES-128-CBC
verb 3
|