|
20.11.2007
OpenVPN and ISA 2006 - Part 3: OpenVPN on ISA - How to create a site-to-site VPN connection with a pfSense Firewall
- 1. Overview
- 2. Configure ISA and OpenVPN on ISA
- 3. Configure pfSense and OpenVPN on pfSense
- 4. Test the s2s
- 5. Test the regular VPN Remote Access Connections
1. Overview
For this part three of the series, OpenVPN is installed on ISA according to Part 2:OpenVPN on ISA. I want you to remember that OpenVPN is not a third-party software for ISA 2006, so installing it on ISA is not something supported or recommended. Be aware of the fact that you are doing it at your own expense(both security and functionality issues).
In a production environment, you must install OpenVPN on a server behind ISA.
We will create an OpenVPN site-to-site connection with a pfSense
firewall.
The network diagram is shown in Figure1.
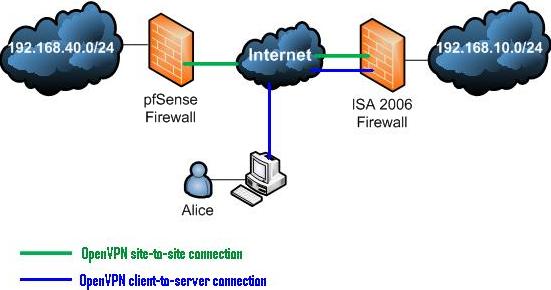
Figure1: The Network Diagram
As can be seen, the OpenVPN server installed on ISA 2006 will served site-to-site connections and also as a remote access VPN server.
2. Configure ISA and OpenVPN on ISA
First thing to modify on ISA is to add 192.168.40.0/24 to the OpenVPN Network Definition(see Figure2).
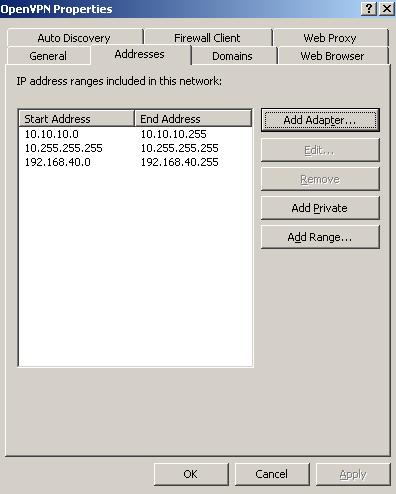
Figure2: The OpenVPN Network on ISA
Next we need to add a route to this network otherwise ISA will start complaining about it and generating alerts(see Figure3).

Figure3: Adding the route on ISA
So by now ISA will have the bellow Persistent Routes.(see Figure4).
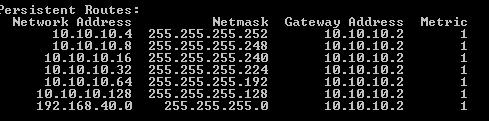
Figure4: Persistent routes on ISA
Time to take care of OpenVPN configuration on ISA. This time OpenVPN uses its default 1194 UDP port. So I have commented the required settings.
A new line "client-config-dir "C:\\Program Files\\OpenVPN\\config"" has been added to the server configuration file specifying the location of the configuration files for clients.
Another line "route 192.168.40.0 255.255.255.0" has been added too to the server configuration file which according to the OpenVPN HowTo doc controls the routing from the kernel to the OpenVPN server.
Also line "tls-auth "C:\\Program Files\\OpenVPN\\easy-rsa\\keys\\ta.key" 0" has been commented disabling the additional HMAC signature.
So this is the configuration file from server.
#remote myremote
local 192.168.10.1
# Uncomment this line to use a different
# port number than the default of 1194.
#port 443
# Choose one of three protocols supported by
# OpenVPN. If left commented out, defaults
# to udp.
#proto tcp-server
dev tun
server 10.10.10.0 255.255.255.0
push "redirect-gateway"
push "dhcp-option DNS 192.168.10.2"
push "dhcp-option WINS 192.168.10.2"
push "dhcp-option DOMAIN carbonwind.net"
dh "C:\\Program Files\\OpenVPN\\easy-rsa\\keys\\dh2048.pem"
ca "C:\\Program Files\\OpenVPN\\easy-rsa\\keys\\ca.crt"
cert "C:\\Program Files\\OpenVPN\\easy-rsa\\keys\\server.crt"
key "C:\\Program Files\\OpenVPN\\easy-rsa\\keys\\server.key" # This file should be kept secret
#tls-auth "C:\\Program Files\\OpenVPN\\easy-rsa\\keys\\ta.key" 0
client-config-dir "C:\\Program Files\\OpenVPN\\config"
route 192.168.40.0 255.255.255.0
cipher AES-128-CBC # AES
# keep-alive ping
ping 10
# enable LZO compression
comp-lzo
# moderate verbosity
verb 4
mute 10
Within the client-config-dir "C:\Program Files\OpenVPN\config" a file named pfsense was created(see Figure5).
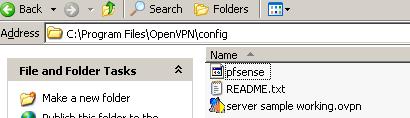
Figure5: The configuration directory
This file contains the follwing lines:
"iroute 192.168.40.0 255.255.255.0
push-reset
push "route 192.168.10.0 255.255.255.0""
This file is used to configure the client called pfsense.
The first line, "iroute 192.168.40.0 255.255.255.0", controls the routing from the OpenVPN server to the remote clients.
The second line, "push-reset ", does not inherit the global push list for the pfsense client(like the redirect-gateway, dns suffix... options).
The third line "push "route 192.168.10.0 255.255.255.0"" advertise the 192.168.10.0/24 subnet to the pfsense client as being accessible through the VPN.
Next I will issue from the CA a certificate for the pfsense user. This certificate will be installed on the pfSense Firewall. The CN on this certificate is pfsense. As you see this CN matches the pfsense file from the client-config-dir. When this client will connect, the OpenVPN server, by viewing its CN, will search through the client configuration directory for a file matching the pfsense name.
The config on ISA is done. Reboot ISA. Then check for any alerts on it and examine the OpenVPN log to see if the OpenVPN server was succesfully started.
3. Configure pfSense and OpenVPN on pfSense
Moving to the pfSense Firewall, 1.0.1 version is used here. Figure6 and Figure7 show the settings for its interfaces.
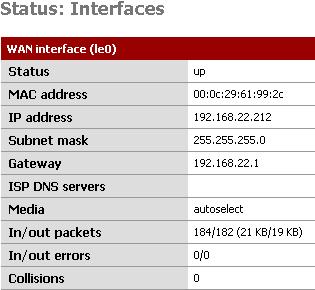
Figure6: pfSense Wan Interface
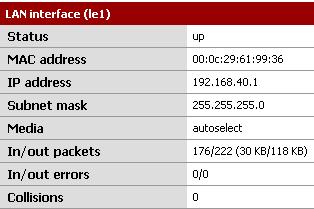
Figure7: pfSense Lan Interface
Basically nothing fancy was configured on it. The IP settings for both Interfaces.
The default firewall rule allowing all from the LAN net to anywhere is in place(see Figure8). You can customise your rules to fit your needs.

Figure8: pfSense Default Firewall Rule
From the browser, point to VPN drop-down menu and select OpenVPN:

Figure9: Navigating to the OpenVPN menu
The OpenVPN menu appears(see Figure10):

Figure10: The OpenVPN Menu
From here click on the Client tab and on the "+" button to add a new OpenVPN client.
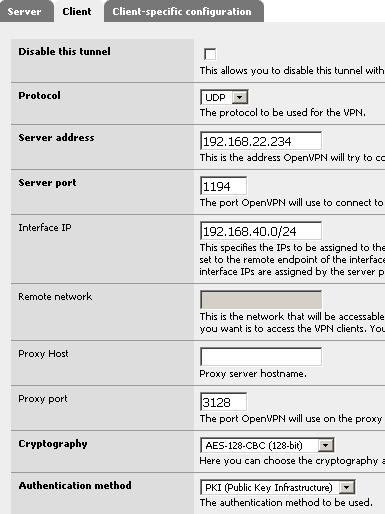
Figure11: Setting for the new VPN Client
From Figure11 we can see that the protocol used is UDP, the UDP port is 1194, the server address is 192.168.22.234(ISA's IP address), the chiper used is AES-128-CBC and the authentication method is set to PKI. Within the Interface IP we will specify the subnet behind pfSense which is 192.168.40.0/24.The Remote Network is greyed-out being inaccessible, because PKI is used.
Next the CA certificate, the Client certificate and the Client private key must be specified.
The CA certificate and the Client certificate must be in X.509 format.
Figure12 shows the files needed on the pfSense Firewall. As can be seen the CA certificate and the pfsense certificate are using the".crt" extension so they are in X.509 format. All we need to do is to open this files with a text editor(I have used WodrPad for example) and copy and paste the lines from the editor into the corresponding fields on the pfSense page.
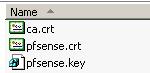
Figure12: Files Needed on the pfSense Firewall
Figure13 shows the CA certificate.
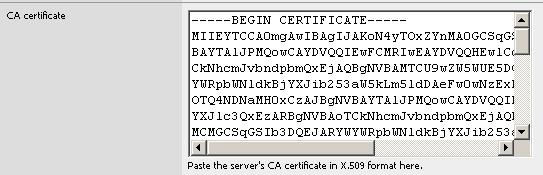
Figure13: The CA certificate
Figure14 shows the Client Certificate(pfsense certificate). The Client key is in RSA format so again you can open it with a text editor like WordPad.

Figure14: The Client certificate
Figure15 shows the Client Key.

Figure15: The Client key
Also we enable LZO compression because on the server the compression is on(see Figure16).
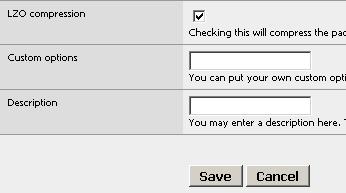
Figure16: Enable LZO compression
And then click the Save button.
And you have successfully added pfSense as an OpenVPN Client for ISA(see Figure17).
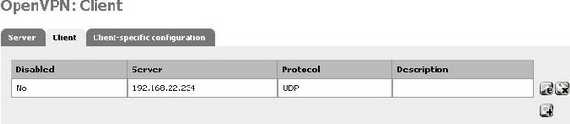
Figure17: The Client added on pfSense
4. Test the s2s
Now just reboot your pfSense machine(just in case). After the boot proccess is completed, pfSense will intialize the TLS tunnel to ISA. If everything works correctly a tunnel will be established.
Check on ISA the OpenVPN log. Bellow are some parts of it. As you can see, the OpenVPN server correctly recognize the pfsense client and applied the require configuration.
"Tue Nov 20 14:58:38 2007 us=834550 192.168.22.212:1194 VERIFY OK: depth=1,
/C=XX/ST=XX/L=XX/O=XX/CN=OpenVPN-CA/emailAddress=XX@XX
Tue Nov 20 14:58:38 2007 us=836754 192.168.22.212:1194 VERIFY OK: depth=0,
/C=XX/ST=X/O=XX/CN=pfsense/emailAddress=XX@XX.XX
Tue Nov 20 14:58:39 2007 us=273803 192.168.22.212:1194 Data Channel
Encrypt: Cipher 'AES-128-CBC' initialized with 128 bit key
Tue Nov 20 14:58:39 2007 us=273938 192.168.22.212:1194 Data Channel
Encrypt: Using 160 bit message hash 'SHA1' for HMAC authentication
Tue Nov 20 14:58:39 2007 us=273963 192.168.22.212:1194 Data Channel
Decrypt: Cipher 'AES-128-CBC' initialized with 128 bit key
Tue Nov 20 14:58:39 2007 us=273984 192.168.22.212:1194 Data Channel
Decrypt: Using 160 bit message hash 'SHA1' for HMAC authentication
Tue Nov 20 14:58:39 2007 us=282504 192.168.22.212:1194 Control Channel:
TLSv1, cipher TLSv1/SSLv3 DHE-RSA-AES256-SHA, 2048 bit RSA
Tue Nov 20 14:58:39 2007 us=282583 192.168.22.212:1194 [pfsense] Peer
Connection Initiated with 192.168.22.212:1194
Tue Nov 20 14:58:39 2007 us=293920 pfsense/192.168.22.212:1194 OPTIONS
IMPORT: reading client specific options from: C:\Program Files\OpenVPN\config\pfsense
Tue Nov 20 14:58:39 2007 us=298636 pfsense/192.168.22.212:1194 MULTI:
Learn: 10.10.10.6 -> pfsense/192.168.22.212:1194
Tue Nov 20 14:58:39 2007 us=298698 pfsense/192.168.22.212:1194 MULTI:
primary virtual IP for pfsense/192.168.22.212:1194: 10.10.10.6
Tue Nov 20 14:58:39 2007 us=298721 pfsense/192.168.22.212:1194 MULTI:
internal route 192.168.40.0/24 -> pfsense/192.168.22.212:1194
Tue Nov 20 14:58:39 2007 us=298755 pfsense/192.168.22.212:1194 MULTI:
Learn: 192.168.40.0/24 -> pfsense/192.168.22.212:1194
Tue Nov 20 14:58:40 2007 us=173783 pfsense/192.168.22.212:1194 PUSH:
Received control message: 'PUSH_REQUEST'
Tue Nov 20 14:58:40 2007 us=174385 pfsense/192.168.22.212:1194
SENT CONTROL [pfsense]: 'PUSH_REPLY,route 192.168.10.0 255.255.255.0,
ifconfig 10.10.10.6 10.10.10.5' (status=1)"
On the pfSense machine check the routing table(from Diagnostisc/Routes). See Figure18.
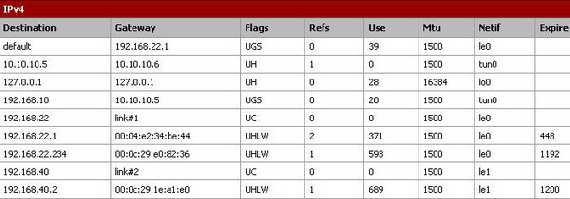
Figure18: pfSense Routing Table
We can easily spot the route to 192.168.10.0/24 and the tun interface. Also the default gateway was not modified.
Now let's test with a ping command in both ways.
First from a client, 192.168.40.2, behind the pfSense Firewall to a client, 192.168.10.2, behind ISA(see Figure19). Remember that an Allow All rule exist on ISA between the OpenVPN and Internal Networks and vice-versa.
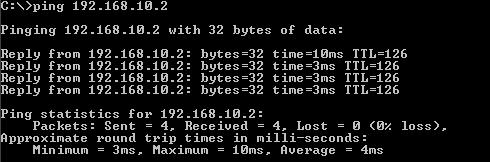
Figure19: Ping from 192.168.40.2 tp 192.168.10.2
And the vice-versa, from a client, 192.168.10.2, behind the ISA Firewall to a client, 192.168.40.2, behind pfSense(see Figure20).
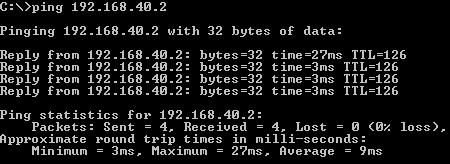
Figure20: Ping from 192.168.10.2 to 192.168.40.2
And it works beautifully. Further tests, accessing Shares, Web servers..., on both sides also were successfully.
So by now the OpenVPN site-to-site between the ISA 2006 Firewall and the pfSense firewall is up and running.
5. Test the regular VPN Remote Access Connections
Now we are going to do a test with a normal OpenVPN client to the OpenVPN server installed on ISA. The client is called alice. There is no alice file in the client configuration directory on ISA.
So alice will receive all the settings specified in the server config file, the redirect-gateway, DNS suffix...
Bellow are some parts of the log from the OpenVPN server:
"Tue Nov 20 16:28:22 2007 us=795987 192.168.22.3:2804 TLS:
Initial packet from 192.168.22.3:2804, sid=7e1c4485 4ad0da55
Tue Nov 20 16:28:23 2007 us=807831 192.168.22.3:2804 VERIFY OK:
depth=1, /C=XX/ST=XX/L=XX/O=XX/CN=OpenVPN-CA/emailAddress=XX@XX.XX
Tue Nov 20 16:28:23 2007 us=809859 192.168.22.3:2804 VERIFY OK:
depth=0, /C=XX/XX=XX/O=XX/CN=alice/emailAddress=XX@XX.XX
Tue Nov 20 16:28:24 2007 us=102432 192.168.22.3:2804 Data Channel Encrypt:
Cipher 'AES-128-CBC' initialized with 128 bit key
Tue Nov 20 16:28:24 2007 us=102487 192.168.22.3:2804 Data Channel Encrypt:
Using 160 bit message hash 'SHA1' for HMAC authentication
Tue Nov 20 16:28:24 2007 us=102511 192.168.22.3:2804 Data Channel Decrypt:
Cipher 'AES-128-CBC' initialized with 128 bit key
Tue Nov 20 16:28:24 2007 us=102613 192.168.22.3:2804 Data Channel Decrypt:
Using 160 bit message hash 'SHA1' for HMAC authentication
Tue Nov 20 16:28:24 2007 us=108892 192.168.22.3:2804 Control Channel:
TLSv1, cipher TLSv1/SSLv3 DHE-RSA-AES256-SHA, 2048 bit RSA
Tue Nov 20 16:28:24 2007 us=108966 192.168.22.3:2804 [alice] Peer
Connection Initiated with 192.168.22.3:2804
Tue Nov 20 16:28:24 2007 us=109950 alice/192.168.22.3:2804 MULTI:
Learn: 10.10.10.10 -> alice/192.168.22.3:2804
Tue Nov 20 16:28:24 2007 us=109988 alice/192.168.22.3:2804 MULTI:
primary virtual IP for alice/192.168.22.3:2804: 10.10.10.10
Tue Nov 20 16:28:25 2007 us=356220 alice/192.168.22.3:2804 PUSH:
Received control message: 'PUSH_REQUEST'
Tue Nov 20 16:28:25 2007 us=356327 alice/192.168.22.3:2804
SENT CONTROL [alice]: 'PUSH_REPLY,redirect-gateway,dhcp-option
DNS 192.168.10.2,dhcp-option WINS 192.168.10.2,dhcp-option
DOMAIN carbonwind.net,route 10.10.10.1,ifconfig 10.10.10.10 10.10.10.9'
(status=1)
Tue Nov 20 16:28:46 2007 us=532880 pfsense/192.168.22.212:1194
MULTI: Learn: 192.168.40.2 -> pfsense/192.168.22.212:1194"
As can be seen alice receives the correct settings. We can run an "ipconfig /all" on alice(see Figure21).
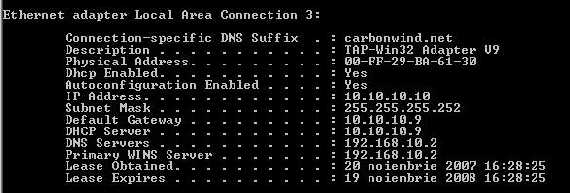
Figure21: ipconfig /all on alice
Notice that alice has the correct DNS suffix, DNS and WINS servers.
|